Selection of a Recurve Bow
Bow length
The first thing to consider when choosing a modern Recurve bow is the length of the arrow being drawn by the archer. Generally, taller people may have longer arms and consequently will need a longer arrow than a smaller archer with shorter arms.
Manufacturers are making both risers and limbs of differing sizes, which can be assembled to give a variety of bow lengths.
The length of a bow is measured around the contour of the bow, from the bottom string nock to the top string nock.
With manufacturers using similar standards it is now quite easy to select a length of bow, which is ideal for shooting a given range of arrow lengths.
The usual bow lengths made for adults are 62”, 64”, 66”, 68”, 70” and 72”, but some manufacturers have slightly different alternative lengths.
A 66” bow would be most suitable for draw lengths of between approximately 26 inches to 28 inches long. A 68″ bow would be most suitable for draw lengths between approximately 28″ and 30″
The angle of the string on the fingers at full draw is the determining factor. If the bow is short and a long arrow is drawn a long distance this would put too much strain on the limbs and also create a small angle in which the fingers are pinched too closely together, which may not allow a clean loose of the arrow.
If the bow is very long and the arrow is only drawn a short distance, then the limbs would not be bent and stressed much, which would result in a lack of stored energy and the bow would be inefficient.
Draw Length
The draw length of a recurve bow is measured and stated in different ways:
a. True draw length – from the throat of the grip (pivot point) to the throat of the arrow nock at full draw. This term is now not generally used.
b. Traditional draw length – from the throat of the arrow nock at full draw to the pivot point plus 1 3/4 “
Draw Weight
Manufacturers’ as in “A.M.O.” (Archery Manufacturers and Merchants Association), mark details of the limbs’ poundage on the bottom limb of a pair. This standard marked measurement is taken by measuring 26 ¼”from the throat of the arrow to the throat of the grip plus 1 ¾”. This gives a standard measure of weight at 28” of draw. This is known as the AMO marked poundage. AMO is now known as ATA (Archery Trade Association)
If an archer draws to a length of more than or less than these values, then the actual draw weight will change correspondingly. Near full draw, each inch of draw length will probably represent about two pounds in weight.
The ideal selected draw weight is the weight that allows the archer to shoot comfortably and correctly over the period of shooting. The last arrow shot of the day should be as comfortable as the first one.
Male archers would probably draw weight of between 36lbs to 44lbs. Female archers would probably draw weights of between 30lbs and 36lbs.
However, an individual should choose (perhaps with the help of a coach), a bow weight that is right and comfortable for themselves.
The standard way of measuring an archers actual draw weight is by marking a full drawn arrow at the point where it is level with the back of the bow. Next re-draw the arrow with a bow scale until the mark is in the same place. Read off the poundage and record it to paper.
This poundage will be important when choosing a set of matched arrows
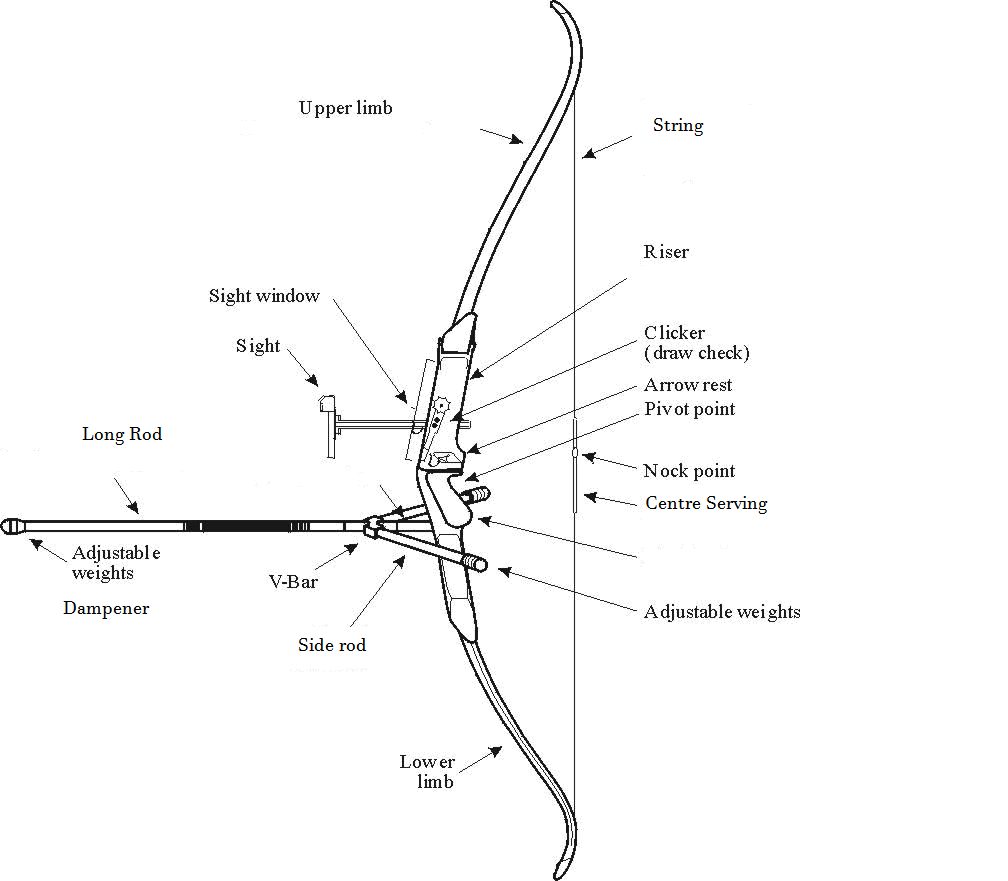
Setting up the Recurve Bow
Always check all parts of your equipment to ensure that nothing is dangerously damaged or worn. Inspect all parts of your bow, limbs, string, servings, arrows and all accessories before you start to shoot. If anything changes or sounds different during shooting, then immediately check your equipment. Continue shooting only when you’re satisfied that everything is safe.
Assembly
Having decided upon which bow riser and limbs to purchase, the exciting part of assembling and tuning can start.
Always make yourself aware of any manufacturers’ recommendations as to the measurements and adjustments of the equipment before you start.
At each stage, measure and record your settings. Also keep records of all the changes made and the results of those changes.
Bow string
Strings are a very important variable to your set-up. There are many different string materials to choose from, each with different characteristics. As the thickness of each string material is different, the string will have to be made with either more or fewer strands. i.e. Perhaps 12 strands of Dacron or 16 to 20 strands of Fast Flite.
Thinner strings will be faster and less forgiving but will make the arrow behave dynamically weaker. Thicker strings will be slower and more forgiving, but will make the arrow behave dynamically stiffer. These facts can be used to further fine tune the arrow flight from the bow. The serving material is also crucial to the fit and therefore the flight of the arrow.
It is well worth learning to make you own strings and experimenting with the different materials, number of strands and bracing heights to give your bow the optimum tune. The club regularly hosts string making workshops, which will be announced on the website.
When you receive your new string it is likely to have been pre-twisted to hold its form, but if it has not, there should be approximately one full twist per 2 inches of bow length, so for a 68″ bow, 34 twists. Your new string is also likely to have been waxed, but again, ensure this protection is added if it has not.
Later, you must practise shooting with more twists and then fewer twists in the string to change the bracing height of your bow. Listen to the noise upon release. Check, by using dry white powder on your arrow fletchings, or lipstick on your button to see when you have the best clearance.
Bracing Height
Starting with the manufacturers’ recommended measurements, twist or untwist the string until the brace height (distance from the handle throat to the string) is about in the middle of the given range. If no information is available then you can measure the length of the string and divide by seven to give you an approximate starting distance. (Some manufacturers use a measurement to the back of the bow).
The most effective brace height will impart most of the bows energy into putting the arrow into good flight and feel and sound the most comfortable to the archer.
Limb alignment and Tiller
After safely attaching the limbs to the riser and the string to the limbs, you will need to check the alignment of the string against the bow. This is known as the string picture. When at full draw, the archer should be aware of the fuzzy image of the string picture in relation to the limbs and the sight aperture. Some of the later bows have an adjustable limb alignment system. These vary from one make to another.

The next check is to measure what is called the bows’ tiller.
For a bow to be efficient both limbs have to work in unison. If they are not set to work together the efficiency of the bow may be reduced.
With a bow square (bracing height gauge), measure the distance at right angles from the string to where the limb enters the limb pocket. To set the initial tiller adjustment, check the manufacturers recommendation. If this is not available, for the initial set-up, set the distance of (a) 3 to 5 mm greater than the distance of (b).
The reason for this difference is the arrow rest is usually above centre. This makes the nocking point above centre, which has an effect on the power differential of the two limbs. To overcome this the lower limb needs to be given a little more power than the top limb.
This may be changed slightly whilst in the process of “fine tuning”, later on.
During tuning you will find which is the most efficient tiller and limb alignment for your own style of shooting.
Pressure Button
Select and mount a suitable pressure button in such a way that the protruding button would position an arrow at about or just to the left of the centre shot position when the string is seen to be aligned down the centre of the limbs when viewed from the archers’ eye. This is a temporary position until the tuning verifies the correct position.
Arrow rest
There are many types of arrow rests. It may be preferable to choose an adjustable magnetic finger loosing rest. These enable the archer to adjust the rest in height, distance from the bow window and in spring tension. This is very useful to the archer when tuning the bow to a set of arrows or when changing between sets of arrows.
Position the rest arm so as to place the arrow diameter just below the height of the centre of the pressure button. In flight the arrow will lift slightly, putting the centre of the arrows’ diameter level with the centre of the button. (Left handed archers be aware that the button could unscrew over time if the arrow is positioned in such a way that the forward movement unscrews the button)
The arm should just hold the arrow and not protrude so much that it interferes with the arrow flight.
Nocking point
Before putting on the nocking point, check the fit of the arrow nock on the centre serving. The arrow nock should click securely on the serving. If it is too tight or too loose then change the nock size or serving to a thickness that enables the arrow to come off the string with a sharp tap of the fingers on the string.Using a bow square, measure from the point where the arrow touches the arrow rest to the string at 90 degrees.
To start with measure up from this point about ¼” and secure a nocking point. Clip an arrow nock above this to gauge where to secure the upper nocking point. Leave just enough room between nocks so that at the angle created in the string at full draw, the arrow is not pinched too tightly. This position may be temporary until adjustment is shown to be needed, whilst tuning for good arrow flight.
Sight assembly
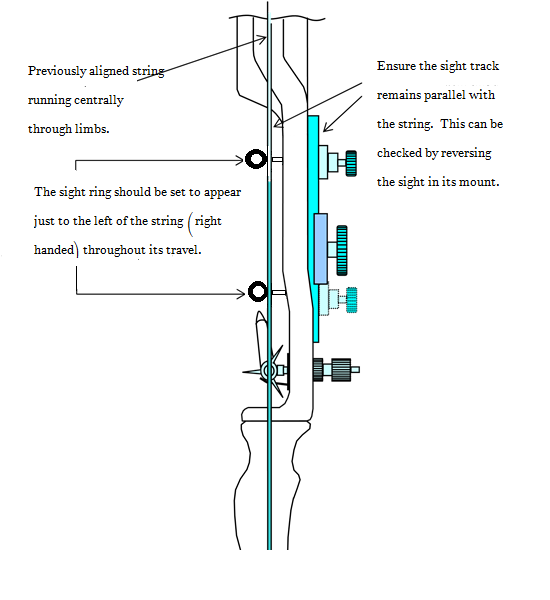
Mount the selected sight securely to the bow. Check that the extension bar is square to the bow. If this isn’t square, then an adjustment either backwards or forwards may also change the windage of the sight.
The elevation bar should be upright and parallel to the bowstring. If this is at an angle, then height adjustment of the sight will also change the windage.
Adjust the aperture of the sight so it appears to a right handed archer to be just to the left of the “string picture”. Try to keep the middle of the windage adjustment in the centre of it’s range.
During the tuning process, try different extension positions to determine which is the best distance for the aperture to be from the bow and your eye, to give the most effective sighting and to reduce the effect of any archer induced bow torque.
Bow balance / Stabilisation
There are so many ways to balance and stabilise the bow that you should borrow and try as many combinations as you are able before you purchase your own. What suits one archer may not be the best solution for another.
The main reason for stabilisation is to increase the moment of inertia of the bow, giving the arrow time to clear the bow before any reaction can interfere with it’s flight.
Most archers prefer the bow to jump straight forward out of their relaxed bow hand before it tilts slightly forward. The other benefit of stabilisation is to dampen the shock as soon as possible, thereby putting more of the energy into the arrow.
The majority of archers will use a long rod to the front, balanced by twin short rods to the rear of the bow. By adjusting the angles and weights the archer is able to achieve the right personal balance.
Bow sling
By using a bow sling the archer is secure in the knowledge that as the bow jumps forward from the relaxed bow hand upon release, the bow will not drop to the ground. This would in itself allow even more relaxation of the bow hand.
The choice and fit of a bow sling could make some difference to your shooting performance
If using a wrist sling, make sure that it is not so tight as to pull the bow hard into the hand. Also not so loose that the bow drops from the hand and lands on the ground. About half to three quarters of an inch play should be about right.
Some prefer to use a finger sling. There are some who think this is a preferable type. There can be no wrist strap induced torque with this type.
The fit of the sling should allow the archer to place the bow hand in the correct position with no hindrance.
Don’t be worried about trying different ideas to see if your form and results improve.
Tab
The fit of a comfortable and well fitting tab is very important.
Most, but not all, target archers use a platform tab. The platform gives a solid vertical reference under the jawbone, assisting in the consistent positioning of the elevation part of the referencing.
You may need to trim around the edges of the tab so as not to have too much material overhanging the fingers or around the arrow nock.
Arrow selection
The selection and care taken of set of good matched arrows is definitely the most important item that an archer should pay attention to.
The arrow manufacturer, Easton, (see their reference guide and chart,) produce a very good arrow selection chart for their range of arrows. Other manufacturers also have their own charts to help with selection.
Crucial to helping with the correct choice of arrow shaft, is, knowing the bows’ actual poundage at your own draw length and also the length of the arrow shaft.
Sometimes, overlong arrows are used either for safety or when wanting to shoot the thickest arrow possible (maximum diameter allowed is 9.3mm.), to increase the chance of cutting a line on the target face for a higher score.
There is a wide range of pile shapes and weights to make further changes to the arrow flight characteristics. Also there are many types of fletchings that enable even further variations that may affect the arrow flight.
Take the time to match the set of arrows to the same weight and balance for best results.
Use your actual draw weight and the eventual length of your shaft when using the charts.
Read the chart instructions and be aware of the different parameters that may change the selection.
e.g. The type of bow string…..Dacron or Fast Flite etc.
Remember also that when taking part in competitions that all your arrows must be marked with your name and numbered.
Clicker draw length check
At some stage later, the use of a draw length check such as an audible clicker may be seen as a benefit to some archers. An audible click signifies to the archer that each arrow has been draw back to exactly the same distance.
Bare shaft tuning to set the nocking point
To find the best position for attaching a nocking point one method of testing is by shooting a series of fletched arrows at a target about 10 – 15 yards away, in as tight a group as possible. Then shooting a “bare” shaft at the same aiming point.
To prepare the bare shaft remove all the fletchings and wrap masking tape around the shaft at the fletching position. Add enough tightly bound tape to make the “bare” shaft weigh and balance like the fletched arrows.
Take note of where the bare shaft hits the target in relation to the fletched shafts.
Initially the aim is to get the bare shaft to be at the same height as the group of fletched arrows. (perhaps a touch lower) If the bare shaft hits higher on the target, then raise the nocking point. If the bare shaft hits lower then lower the nocking point. Keep adjusting until the bare shaft hits at about the same height as the fletched group. Then fix the nocking point securely at that point.
The next test is to get the bare shaft within the group of fletched arrows. If the bare shaft is left of the group (stiff) then try backing off the spring tension of the button. If the bare shaft is to the right of the group (weak) then increase the spring tension.
Testing for arrow clearance
The type of rest chosen may affect the orientation of the arrows’ fletching.
Stand about 5yds from a boss. Have your sight set correctly for this distance.
Spray the back part of the arrow and fletchings, with dry white powder. (available from welding accessory dealers) Nock the arrow carefully making sure not to mark the white powder.
Shoot the arrow into the boss.
Before touching the arrow inspect it carefully, particularly around the fletchings, to see if there are any signs of contact with the bow or rest.
If there are signs of contact then try adjusting any or all of :-
Button tension and position
Buttons centre shot position
Nocking point height
Nock and fletching orientation
All these adjustments are only the start of testing for best arrow flight.
When it is clear that you have good arrow clearance, then go on to:-
Walk back tuning
Make sure that there is plenty of overshoot behind the target for this method.
At 20 yards set your sight so that the fletched arrows hit the target at the centre point at which you are aiming
Reverse a target face on the boss, exposing a completely plain white sheet. Now mark a dark spot of about 2 inches diameter on the paper about 5 inches from the top of the target at the 12 o clock position.
Standing at 20 yards away shoot a series of 3 to 6 arrows at the spot. You should have a nice tight group in or around the spot. (Remember that the more experienced archer will shoot tighter groups than a newer archer)
Mark a pencil line around the group
Walk back another 5 yards. Without adjusting the sight, shoot the same series of arrows at the same spot.
Walk back and shoot at the same spot at each 5 yards interval right back to about 50 yards.
Each time draw a line around the group.
You will notice that each group has travelled down the face of the target. Even if the group has spread a little you will be able to mark the group centres.
Ideally each group centre down the target face will be in a vertically straight line.
If the line is vertical then the setting is probably correct.
If the line is straight but working out to the bottom left as you walked back, then the button spring tension will need to be backed off a little.
If conversely, the line is to the right, then increase the button tension.
If the line is curved like the letter “ ( ” then move the button tip in towards the bow.
A reverse “ ) ” will need the button tip winding out from the bow.
These actions are relating to a right handed archer. Left handed archers would reverse these instructions for button adjustment.
Other tuning tests
There are several other methods for testing and optimising your bow and arrows’ performance.
Tiller adjustment
Nocking point tune for groups at a middle to long distance
On the rails tuning.
Be prepared to read and listen to other archers’ ideas. Try things for yourself. Much more useful knowledge may be gained.
Some methods may suit your particular style more than others. (It may be that your perception of some methods will give you more confidence).
However, don’t get too hung up on “tuning”. Frequent good form practise will do more for good shooting than continual and frustrating testing.
Recurve settings log
.